

OneDrive for Business: Tips and Tricks for High-Performing Admins
This article focuses on administration and management exclusively for OneDrive for Business. We will cover advice and best practices from my extensive experience working with services ideal for system admins and those actively working with it on a daily basis.
What is Microsoft OneDrive?
Microsoft has two different but similar services called OneDrive, both offering users cloud file storage. A free version of OneDrive is available to everyone and is often called the “consumer” version. The business version is “OneDrive for Business” and requires a subscription to Microsoft 365 or Office 365. Both look a lot alike but are managed very differently. To add to the mix, Microsoft often refers to OneDrive for Business as simply “OneDrive” in their documentation and even in the UI.
Note: I may refer to OneDrive instead of OneDrive for Business from time to time in this article for the sake of brevity, but I always mean OneDrive for Business unless otherwise stated.
OneDrive for Business has company-wide administration in mind. A service administrator can control the deployment of the synchronization app, network performance, and many other settings. With OneDrive (consumer), there is no management framework. The individual using the service controls their settings.
Where Should Users Save Files?
OneDrive for Business makes it very easy to share files with others, but if you find yourself sharing lots of files, it is recommended to use Teams or SharePoint instead. Teams and SharePoint are simply better for collaboration. For example, with OneDrive, you can’t check in and check out a document.
Also, in Teams, any document you upload to Teams is available to the entire Team by default, whereas documents you upload to OneDrive are private by default. Also, in Teams, a conversation about a document is shared in a Teams channel rather than via email. The general guidance is that if you are working on a file without others involved, use OneDrive for Business. If you need others involved, use a more collaborative service like Teams or SharePoint.
OneDrive for Business uses SharePoint Online as Service
As the service administrator, one of the most important concepts to master is that OneDrive for Business is a special-purpose SharePoint document library created automatically for every user in your company. When a user is assigned an Office 365 or Microsoft 365 license, the services automatically create a personal OneDrive for Business document library.
The URL for OneDrive for Business is formatted as follows:
https://<company base name>-my.sharpoint.com/personal/<user-id>
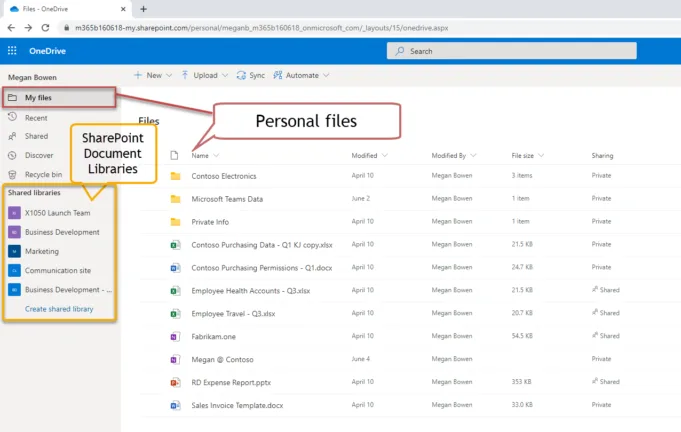
The landing page (shown above) for OneDrive for Business shows “My Files,” which are your files. You can also navigate from here to any SharePoint asset, including SharePoint Document Libraries, files hosted for Teams, or other SharePoint content.
Now that you know OneDrive for Business is using SharePoint under the hood, the following guidance makes sense:
To manage the OneDrive sharing settings for your organization, use the Sharing page of the new SharePoint admin center instead of the Sharing page in the OneDrive admin center. It lets you manage all the settings and latest features in one place.
In this way, settings related to file sharing on SharePoint are aligned with those for OneDrive for Business (and Teams, which also uses SharePoint as a file store). OneDrive picks up many features from SharePoint, such as the ability to do File Restores, Restore a previous version of a file, and synchronize files to your desktop.
OneDrive Integrated With Other Microsoft 365 Tools
OneDrive for Business extends its utility far beyond mere file storage and sharing. When strategically integrated with other Microsoft 365 tools, it transforms into a powerhouse for collaboration, productivity, and seamless workflow management.
OneDrive for Business is intricately woven with Office Online, including Word, Excel, PowerPoint, and OneNote. This integration permits users to create, edit, and collaborate on documents directly within OneDrive without the need to toggle between applications. Changes are automatically saved and synced, ensuring that the most current version of the document is always available, regardless of where or how it’s accessed.
Another integration capability is with Power Automate. This integration with Power Automate (formerly Microsoft Flow) opens up possibilities for workflow automation. You can create custom flows that automatically perform actions in OneDrive based on specific triggers. For example, you might set up a flow to notify team members when a new file is added to a specific OneDrive folder or to automatically archive files when they reach a certain age. This integration not only saves time but also enhances efficiency by reducing manual tasks.
For organizations that rely on data-driven decision-making, integrating OneDrive for Business with Power BI can be transformative. Power BI can connect to Excel files stored in OneDrive, enabling dynamic data analysis and visualization. This integration allows for real-time updates to reports and dashboards as the underlying Excel files are updated in OneDrive, ensuring that decision-makers always have access to the most current data insights.
OneDrive for Business also integrates seamlessly with Outlook, allowing users to easily attach files from OneDrive to emails. Additionally, users can share links to OneDrive files instead of attaching them, which is particularly useful for large files or when collaborating on documents. Outlook’s calendar features can also be used to set reminders for follow-ups on shared OneDrive files, integrating task management with file sharing.
Finally, OneDrive for Business, when integrated with Microsoft Search, offers a unified search experience across Microsoft 365. This integration allows users to perform a single search to find documents, conversations, and people across OneDrive, Outlook, and other Microsoft 365 applications. It streamlines the process of locating information and saves valuable time.
OneDrive for Business’s integration with other Microsoft 365 tools not only enhances its core functionalities but also elevates it to a comprehensive platform for advanced collaboration, workflow management, and data security. While this is due to the fact that OneDrive is part of the Microsoft family of collaboration and productivity tools, you’ll now see just how seamless access can be with Teams and other tools.
Easy Anonymous Access
One main reason OneDrive for Business is well-liked is that it’s easy to share a document with anyone. You can send someone a URL to a document and relax. It works, and you won’t hear the dreaded “I can’t open the document” (which is all too common and a huge productivity sink).
The screenshot below exemplifies my point. What’s being shown is the side-by-side sharing experience in Teams vs. OneDrive. Take note! There is no Share option in Teams. You can copy the link to the file, but you must know if the user you send it to has the right to view the document in the Teams library. In OneDrive for Business, however, a Share option allows you to send a URL to anyone. Anonymous Access is one of the primary reasons users share from OneDrive rather than Teams.
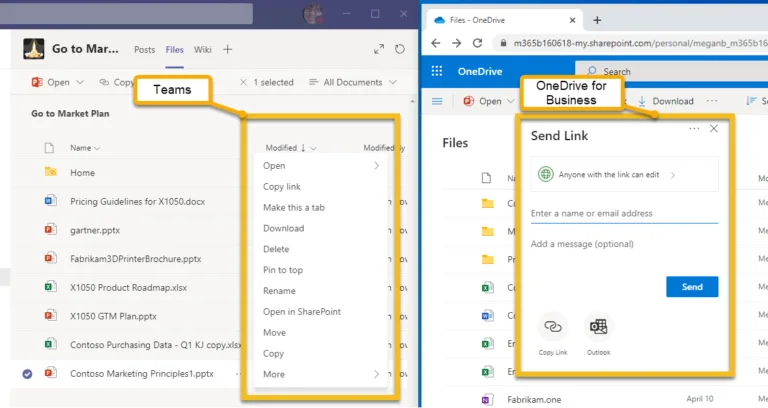
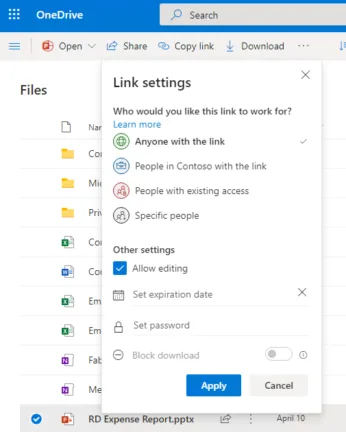
Also, in OneDrive, if you click on Anyone with the link can edit, you can further refine the Sharing options.
As a side note, users frustrated by Teams’ lack of sharing controls can easily open a document or folder in SharePoint instead of Teams (as shown below). In SharePoint, you can share the file with anyone, just like in OneDrive. There’s no need to copy a file in Teams to OneDrive to share anonymously. Just open it in SharePoint instead!

Many businesses prefer to control who can open company documents. You can change the default settings in the OneDrive administration center, but let’s follow Microsoft’s advice to use SharePoint administration instead.
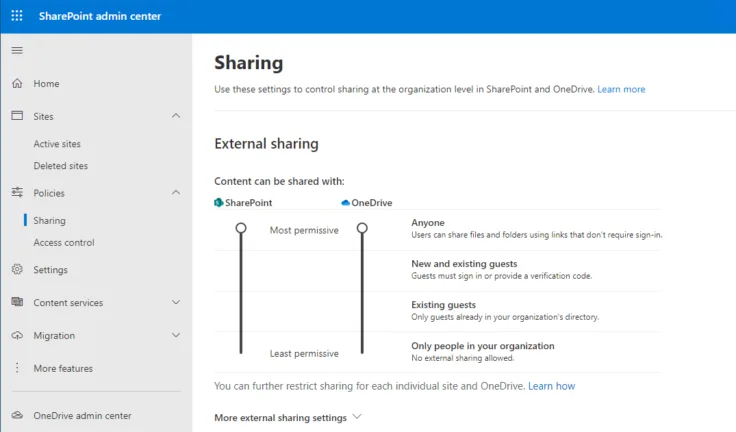
There are separate controls for External Sharing for SharePoint and OneDrive, ranging from Only people in your Organization to Anyone. However, what a static snapshot does not reveal is that the OneDrive settings cannot be more permissive than SharePoint. If you lower the permission on SharePoint, the permission also lowers it on OneDrive. OneDrive can be more restrictive than SharePoint but never less restrictive. Since SharePoint hosts OneDrive files, this makes sense.
These settings are company-wide. Let users know before you make changes to global settings that cause changes in expected behavior. You WILL hear from them, and it generally won’t be a happy face emoji.
When guest users are needed, as they frequently are, consider securing the environment with the guidance provided by Microsoft in the documentation page titled Create a secure guest sharing environment.
Savvy admins can control sharing using options available when you click on More external sharing settings on the same screen shown above:
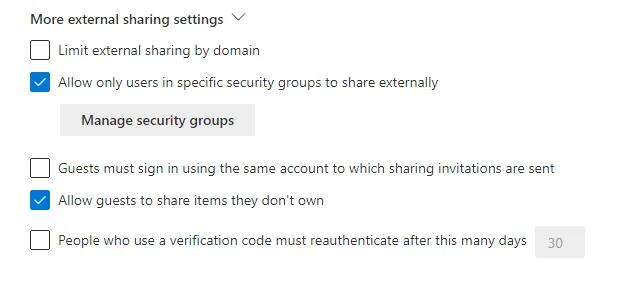
The option Limit, external sharing by domain, lets you allow or deny sharing to a particular domain. This can be a great way to go when you want to constrain sharing to a specific set of partners or external resources.
Allowing only users in specific security groups to share externally lets you control who can share files with people outside your organization. A security group is an Azure AD object that is generally a collection of users and other groups. After populating the security group with users, you can assign permissions and policies to the group, such as granting the group access to a SharePoint site or a mailbox or forcing group members to use 2-factor authentication.
Consider the following scenario. Marketing involves a lot of external sharing, so we want to enable sharing for members of Marketing but deny everyone else, AND we don’t want to make adjustments every time someone moves into or out of marketing.
To illustrate how this can be achieved with security groups, I created a security group in Azure AD named Marketing-Org and added four users. As employees come and go, marketing members are added to and removed from this group. (If you haven’t created security groups in Azure AD, it’s straightforward.)
Next (shown below), I created another security group called External-Sharing.
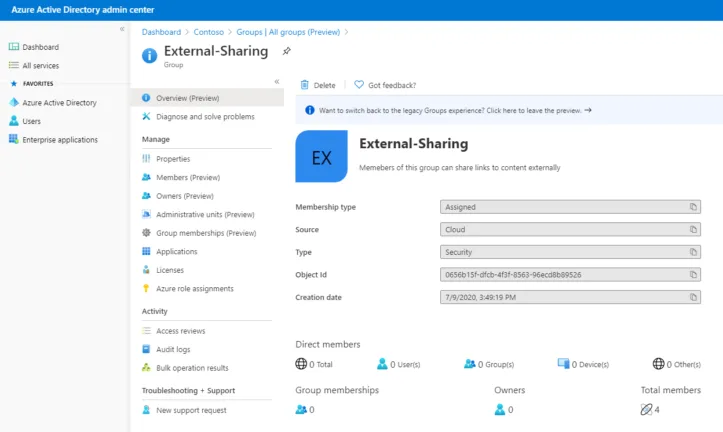
Security groups can have other security groups as members! By adding Marketing-Org to External-Sharing, the users in Marketing-Org automatically inherit External-Org permissions and policies
After that, I assigned the sharing permissions to the External-Org group. Returning to the SharePoint admin center, Policies->Sharing->More external sharing settings-> Allow only users in specific security groups to share externally. Then, by clicking on Manage Security Groups (shown below), I added the External-Sharing group and set them so they can be shared with anyone. To limit everyone else’s ability, I added the built-in security group Everyone except external users and set them to share with Authenticated guests only.
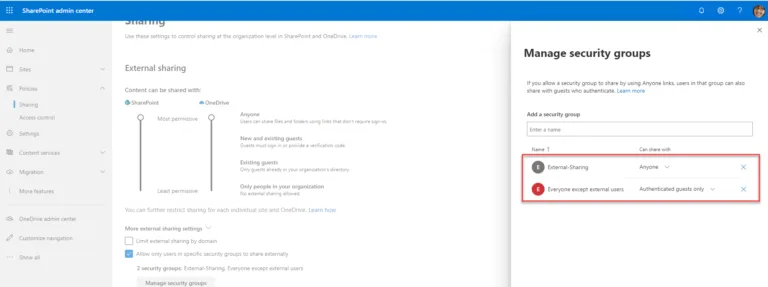
In this way, everyone in the company can only share with authenticated guests, whereas only the members of External-Sharing can share with anyone.
The screenshot below shows the result. The user on the left is not a member of the External-Sharing group (the Anyone option is grey and cannot be selected). However, the user on the right can.
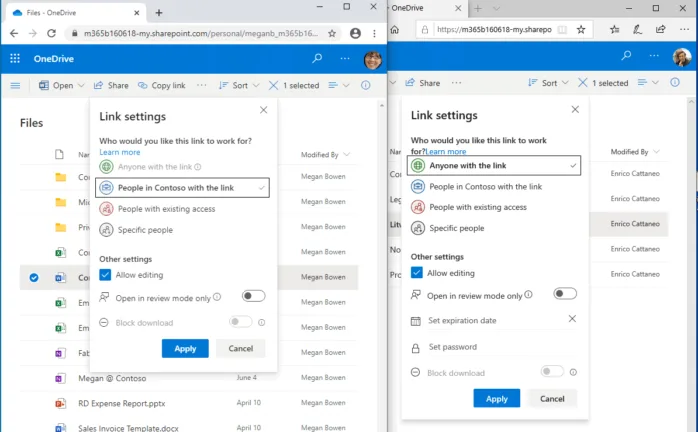
Once configured, effective administrators can manage membership of the security groups using PowerShell with the Add-AzureADGroupMember and associated cmdlets.
Storage space per user
Most Microsoft 365 and Office 365 plans come with 1TB of storage per user for OneDrive. If there are more than five users on a plan, 1TB can be increased by administrators to 5TB. You can even go to 25TB on a user-by-user basis by filing a support ticket with Microsoft.
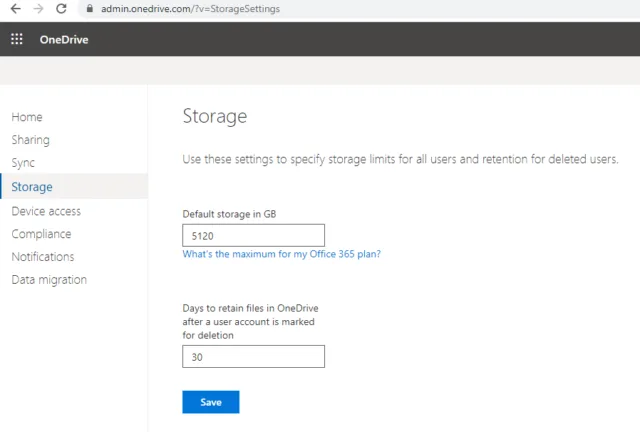
To increase the storage limit for all users, browse the OneDrive administration console and select Storage. Change the setting from 1024 to the new limit. Shown below is updating the limit to 5TB. There are no additional charges for the increase in capacity.
A global or SharePoint admin can change storage quotas with PowerShell after you connect to SharePoint using the SharePoint Online Management Shell and run the following command:
Set-SPOSite -Identity <user’s OneDrive URL> -StorageQuota <quota>. You have to construct the OneDrive URL from the company name and user name, as mentioned earlier. Then, find the user name from the list of active users in the Office or Microsoft 365 admin center.
For <Quota>, enter a number between 1024 (1MB is the minimum) and 5242880 (for 5 TB). Values are rounded up. 1TB is 1048576.
As of this writing, OneDrive allows files up to 100GB.
Request Files
In some scenarios, you may want to collect files from others rather than send files to others. OneDrive for Business makes this easy with the Request Files feature. With this feature, users can send an email asking others to upload content to a specific folder.
To set up a request files email, in the OneDrive UI, select a folder, click on the ellipses (…), and click Request files. You will see a window similar to the one shown below.
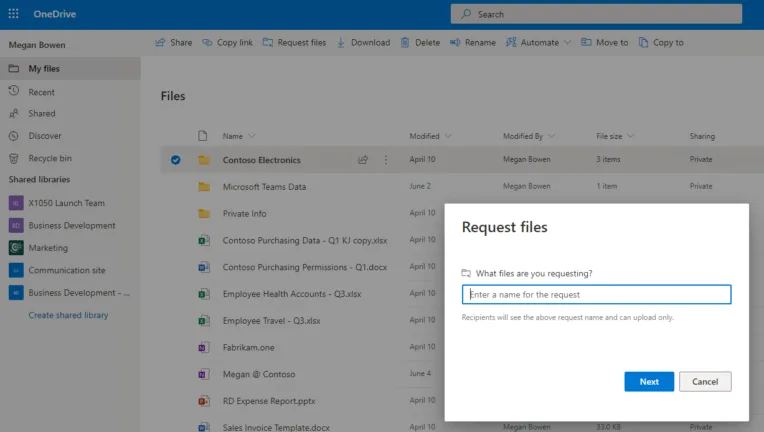
After clicking Next, you will see the Send file request window:

The email sent by this form provides a URL for uploading content to the OneDrive for Business folder. Request files are a great way to collect and concentrate needed files into a single location for processing. That said, you need to make sure to enable uploads for the folder locations in the request.
Of course, a savvy administrator is thinking, “Hmm, does this provide a way for these users to upload content forever to this location?” Shown below is the SharePoint admin center for Policies and Sharing.
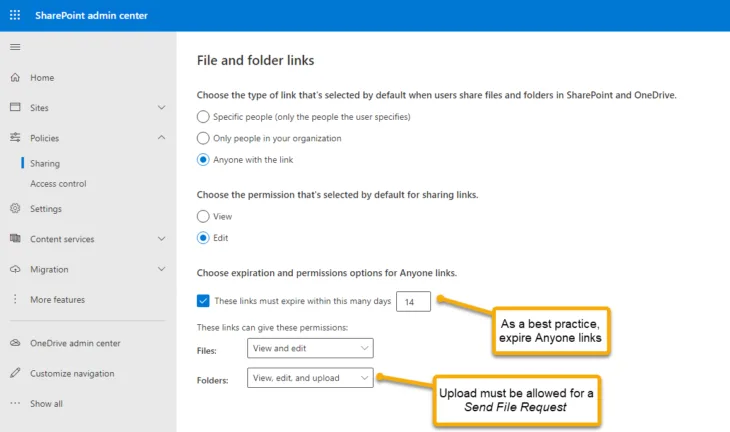
With these settings, you can limit the ability to upload files to the location access given in the Request files invitation. These settings apply to anonymous links sent from OneDrive and SharePoint as well. As a best practice, if you permit users to send links to Anyone enabled by default, you should expire those links. Otherwise, over the years, there can be hundreds or thousands of URLs that provide access to your content, making access control distressingly challenging or impossible without disabling anonymous access altogether.
Folders must be set to View, edit, and upload as shown above to allow users to upload files in response to a file request.
Synchronization
One of the main features of OneDrive for Business is the ability to synchronize files from a user’s PC or laptop with OneDrive. With the synch service running, users can work on files locally, and the changes are sent to the cloud. Also, well-known folder locations such as Documents can be synchronized, ensuring essential documents are both local and in the cloud. You can easily sync Teams File Repositories as well as SharePoint Document Libraries.
The synchronization service is part of Windows 10, so you do not generally need to download it individually. Users can install the service by clicking Start and typing OneDrive.
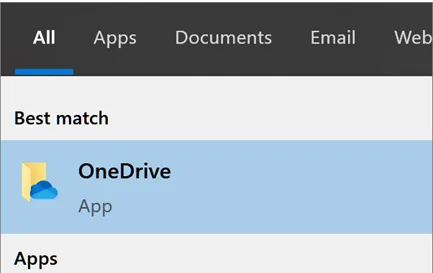
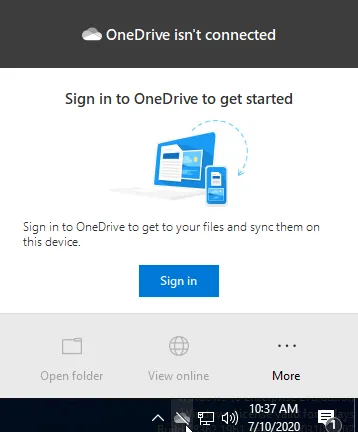
Click on the OneDrive app to launch the setup. OneDrive is then accessible in the taskbar as the cloud icon (shown before logging in below).
Alternatively, users can enable the client by logging into onedrive.microsoft.com and clicking Sync.
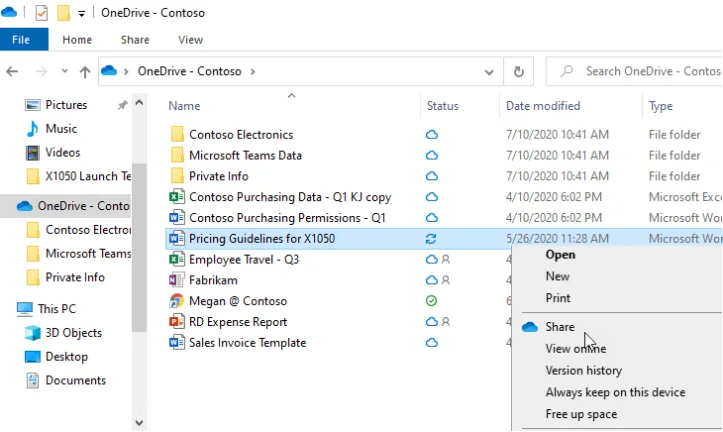
When installed, users can enjoy the integration of OneDrive with Windows File Explorer. A OneDrive location is visible in the File listing. The OneDrive file listing is unique as you can see if a file is in the cloud (cloud icon), local and in the cloud (checkmark), or synchronizing (arrows). Also, when you right-click on a file in the OneDrive folder, you can Share a file, View it online, and check the version history.
Pay particular attention to the following icons. Shown below is a screenshot from one that appears during the installation of the OneDrive client.
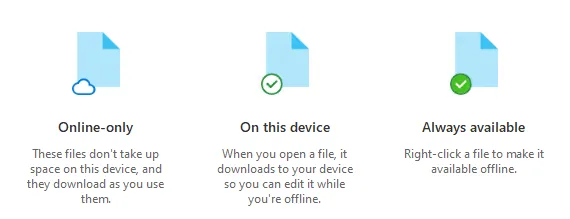
TAKE NOTE – File on demand enabled by default!
Imagine this scenario. You are working on an important project with several others. A Teams site is used for collaboration. You’re headed out for an important client meeting, and a colleague posts several important files to Teams. You’ve installed the sync client and headed off to the airport, so you think, “no worries, I’ve got them synced to my laptop, and I can view them in flight.” Aloft, you open your laptop and see there is a cloud icon next to files. Clicking on a file, it’s not accessible. What happened?
What happened is the Files On-Demand is enabled by default.
Files On-Demand marks content that appears in the cloud as cloud-only. A file added to a Teams File Repository will not automatically sync locally. It’s not available offline until you open the file or set the file or folder to Always keep on this device. Optionally, you could also disable Files On-Demand, which we’ll get to in a minute.
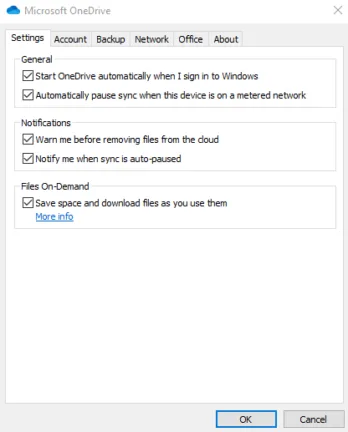
For an important file or folder, right-click in Windows Explorer and select Always keep on this device. Users can also disable Files On-Demand in the OneDrive client by opening the client and clicking More->Settings->Settings, then clearing the checkbox that reads Files On-Demand.
When you clear the checkbox, a pop-up message says that, indeed, the files will download to your PC instead of being cloud-only.
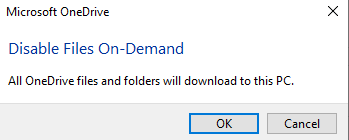
Be advised that as the message above states, if your files in OneDrive for Business take up, say, 1TB, then that 1TB will be downloaded to your PC. Local storage needs to allow for this. Also, administrators need to consider the impact on bandwidth should you disable Files On-Demand for many users at the same time.
As an alternative, consider instructing users to mark files and folders they want to always be available offline as “Always available on this device” using Windows File Explorer, as previously discussed. Then you can keep Files On-Demand enabled to preserve bandwidth as only the designated files and folder will be permanently synched, while those you open will be temporarily synched. All others will reside in the cloud.
Using Policy
For small businesses, administrators can manage OneDrive for Business effectively with the OneDrive for Business administration console. Larger organizations will be interested in using the policy. The policy system for Microsoft and Office 365 is considered the most efficient way to manage many settings, including those for OneDrive for Business. Policy-based administration provides administrators control, scale, repeatability, and flexibility.
Policy automation can be a complicated topic and breaks into different scenarios depending on your network architecture and configuration. For those with on-premise Active Directory environments, you manage policy via SCCM or Azure AD Domain Services.
If your environment is cloud-only (meaning you are not using domain controllers locally), using Microsoft’s InTune service lets you deploy the OneDrive sync service to desktops using the Microsoft Endpoint Manager admin center.
You can also create and apply profiles to users that control OneDrive behavior. Shown below is a policy profile limiting the client upload rate to a percentage of available bandwidth. This is one of many possible settings to control OneDrive policies in Microsoft Endpoint Manager.
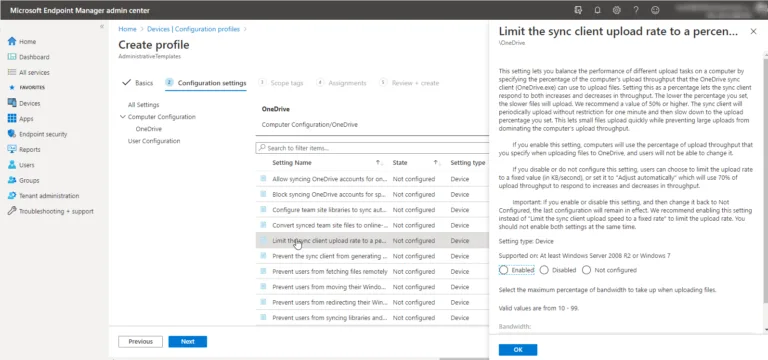
Previously, you saw how you can limit sharing with anonymous users to members of a specific security group. Similarly, you can apply different policy profiles to different security groups.

In this way, you manage the behavior of OneDrive and many other aspects of your cloud service by membership in security groups. It’s easy to imagine uses for this practice with a group for New Hires, Legal-Review-Team, Alliance Partners, Vendors, or other typical roles with differing needs in a busy organization.
Network Impact
In regards to OneDrive, you want to be thoughtful about bandwidth consumption in your company, especially on the initial deployment of OneDrive for Business. More than one company has had issues with essential business services becoming sluggish when hundreds or even thousands of newly deployed OneDrive for Business sync clients start downloading content at the same time. Files On-Demand, as discussed earlier, helps significantly to reduce the initial bandwidth hit as files located in the cloud are not automatically downloaded to clients when enabled.
Known folder moves (discussed next) can also impact network performance by automatically uploading users’ local folders to the cloud when the client is deployed. To help manage network impacts, the OneDrive sync client has bandwidth controls built-in. For a small business, you may want to adjust these settings on each users’ system. Right-click on the OneDrive for Business sync client, then click Settings->Network to see the settings.
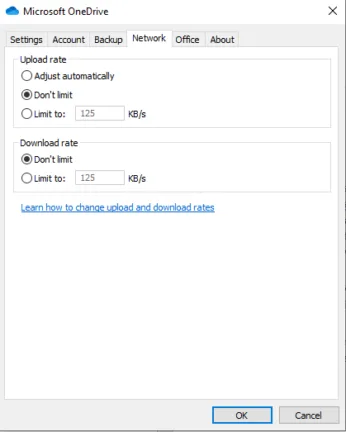
In a larger business, you can use policy to push the desired settings, including the ability to mark OneDrive network traffic with QoS settings
Known Folder Moves
Finally, a feature called Known Folder Moves is of keen interest to administrators as it can help reduce support desk calls and ease users’ transitions to new computers when replaced or upgraded.
As you probably know, specific folders in Windows, such as Documents, Desktop, and Pictures, and others are unique. These are “known folders” as they are in the same location in the file system on every Windows operating system.
OneDrive includes a feature where known folder locations are synced to OneDrive for Business. When a user needs a file in one of these locations and their PC is not available, they can access it from any device, including a mobile device that has an internet connection. Also, when a user moves to a new PC or laptop, all the previous documents, images, and important files are online and can easily be synched back to the new device.
Known Folder Moves can be enabled in the sync client by clicking on Setting->Backup->Manage Backup.
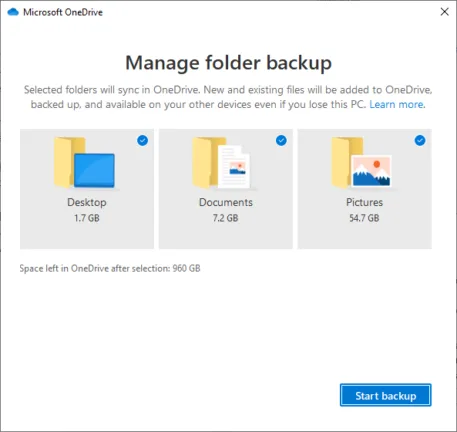
Of course, you can also use policy with the methods previously discussed. Should you decide to roll this out, be mindful of bandwidth impacts and network performance, all that content will be uploaded to the cloud.
Summary
OneDrive for Business is an exceptionally useful service. In this article, we’ve discussed many of the key considerations, benefits, best practices, and capabilities of OneDrive for Business so you can effectively manage the service for users. A capable administrator will understand the business use cases for sharing as well as the network impact of OneDrive for Business, and be familiar with how to administer the service including using policy to enforce the desired settings for your Business.
When set up, users will enjoy cloud access to essential files, including their Desktop, Document, Pictures, Team sites, and other files of importance, allowing them to share content quickly and work locally or collaboratively.
Of course, Microsoft is continuously updating OneDrive for Business, so as a last tip, bookmark the Microsoft official OneDrive blog to keep up-to-date.

