Managing Mailbox Retention and Archiving Policies in Microsoft 365
Microsoft 365 (formerly Office 365) provides a wide set of options for managing data classification, retention of different data types, and archiving data. This article will show the options a Microsoft 365 administrator has when setting up retention policies for Exchange, SharePoint, and other Microsoft 365 workloads and how those policies affect users in Outlook. It’ll also cover the option of an Online Archive Mailbox and how to set one up.How To Manage Retention Policies in Microsoft 365
There are many reasons to consider labeling data and using retention policies. But before we discuss these, let’s look at how Office 365 manages your data in the default state. For Exchange Online (where mailboxes and Public Folders are stored if you use them), each database has at least four copies spread across two data centers. One of these copies is a lagged copy, which means the replication to it is delayed to provide the option to recover from a data corruption issue. In short, a disk, server, rack, or even data center failure doesn’t mean you lose your mailbox data. Further, the default policy (for a few years now) is that deleted items in Outlook stay in the Deleted Items folder “forever” until you empty it, or they are moved to an archive mailbox. If an end-user deletes items from their Deleted Items folder. In that case, they’re kept for another 30 days (as long as the mailbox was created in 2017 or later), meaning the user can recover it by opening the Deleted Items folder and clicking the link.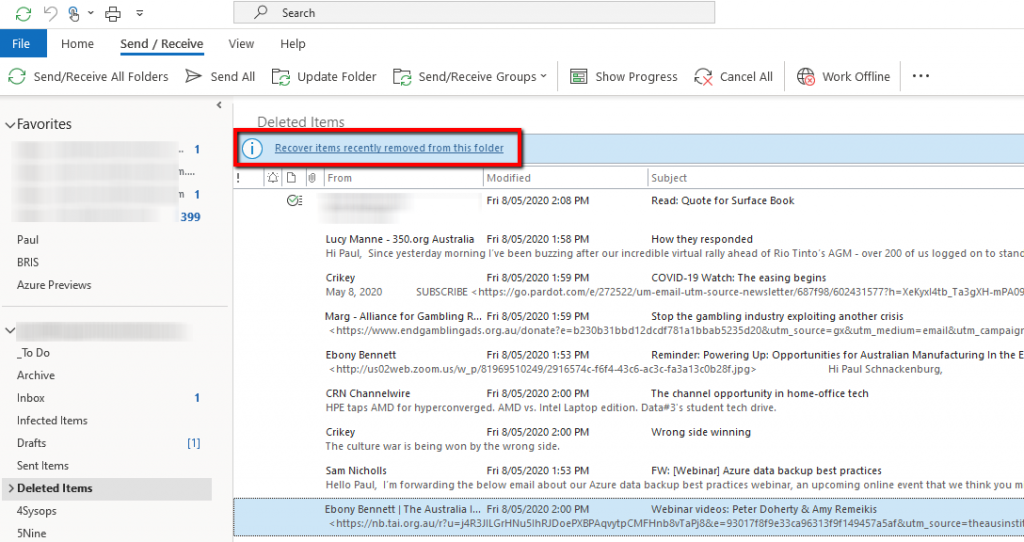
Where to find recoverable items in Outlook
This opens the dialogue box where a user can recover one or more items.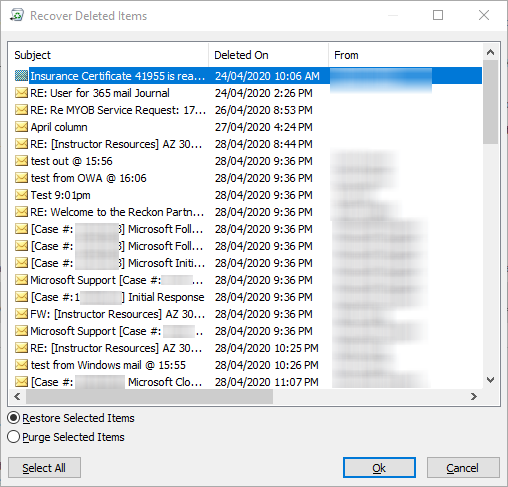
Recovering deleted items in Exchange Online
If an administrator deletes an entire mailbox, it’s kept in Exchange Online for 30 days, and you can recover it by restoring the associated user account. Additionally, it’s also important to realize that Microsoft does not back up your data in Microsoft 365. Through native data protection in Exchange and SharePoint Online, they ensure they’ll never lose your current data, but if you have deleted an item, document, or mailbox for good, it’s gone. There’s no secret place where Microsoft’s support can get it back from (although it doesn’t hurt to try), hence the popularity of third-party backup solutions such as Office 365 Backup.Litigation Hold – the “not so secret” secret
One option that I have seen some administrators employ is to use litigation or in-place hold (the latter feature is being retired in the second half of 2020), which keeps all deleted items in a hidden subfolder of the Recoverable Items folder until the hold lapses (which could be never if you make it permanent). Note that you need an E3 or Exchange Online Plan 2 for this feature to be available. This feature is designed to be used when a user is under some form of investigation and ensures that user can purge no evidence, and it’s not designed as a “make sure nothing is ever deleted” policy. However, I totally understand the job security it can bring when the CEO is going ballistic because something super important is “gone.”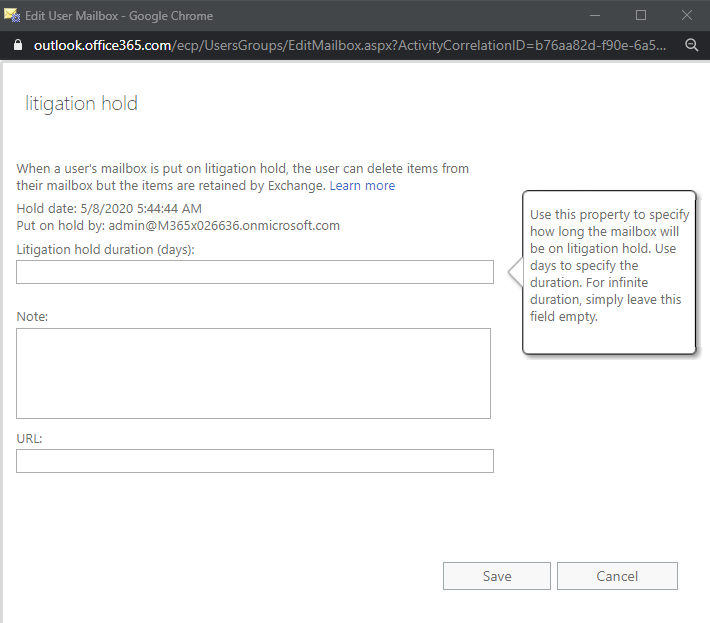
Litigation hold settings for a mailbox
Retention Policies
If the default settings and options described above don’t satisfy the needs of your business or regulatory requirements, the next step is to consider retention policies. A few years ago, there were different policy frameworks for the different workloads in Office 365, showing the on-premises heritage of Exchange and SharePoint. Thankfully, we now have a unified service that spans most Office 365 workloads. Retention in this context means the data can’t be deleted until the retention period expires. There are two flavors here: label policies that publish labels to your user base and letting users pick a retention policy by assigning individual emails or documents a label (only one label per piece of content). Note that labels can do two things that retention policies can’t do: firstly, they can apply from the date the content was labeled, and secondly, you can trigger a disposition / manual review of the SharePoint or OneDrive for Business document when the retention expires. Labels only apply to objects that you label; it doesn’t retroactively scan through email or documents at rest. While labels can be part of a bigger data classification story, anything that relies on users remembering to do something extra to manage data will only work with extensive training and for a small subset of very important data. You can (if you have E5 licensing for the users in question) use label policies to automatically apply labels to sensitive content based on a search query you build (particular email subject lines or recipients or SharePoint document types in particular sites, for instance) or to a set of trainable classifiers for offensive language, resumes, source-code, harassment, profanity, and threats. You can also apply a retention label to a SharePoint library, folder, or document set. As an aside, Exchange Online also has personal labels similar to retention labels but created by the users themselves instead of being created and published by administrators. A more holistic flavor, in my opinion, is retention policies. These apply to all items stored in the various repositories and can apply across several different workloads. Retention policies can also ensure data is retained for a set period AND disposed of after the expiry of the data, which is often a regulatory requirement. A quick note here, if you’re going to play around with policies, is that they’re not instantaneously applied – it can take up to 24 hours or even 7 days, depending on the workload and type of policy – so prepare to be patient. These policies can apply across Exchange, SharePoint (which means files stored in Microsoft 365 Groups, Teams, and Yammer), OneDrive for business, and IM conversations in Skype for Business Online / Teams and Groups. Policies can be broad and apply across several workloads or narrow and only apply to a specific workload or location in that workload. An organization-wide policy can apply to the workloads above (except Teams, you need a separate policy for its content), and you can have up to 10 of these in a tenant. Non-org-wide policies can be applied to specific mailboxes, sites, or groups, or you can use a search query to narrow down the content that the policy applies to. The limits are 10,000 policies in a tenant, each of which can apply to up to 1000 mailboxes or 100 sites. Especially with org-wide policies, be aware that they apply to ALL selected content. So if you set it to retain everything for four years and then delete it, data will automatically disappear after four years. Note that you can set the “timer” to start when the content is created or when it was last modified; the latter is probably more in line with what people would expect. Otherwise, you could have a list that someone updates weekly disappear suddenly because it was created several years ago. To create a retention policy, log in to the Microsoft 365 admin center, expand Admin centers, and click on Compliance. In this portal, click on Policies and then Retention under Data.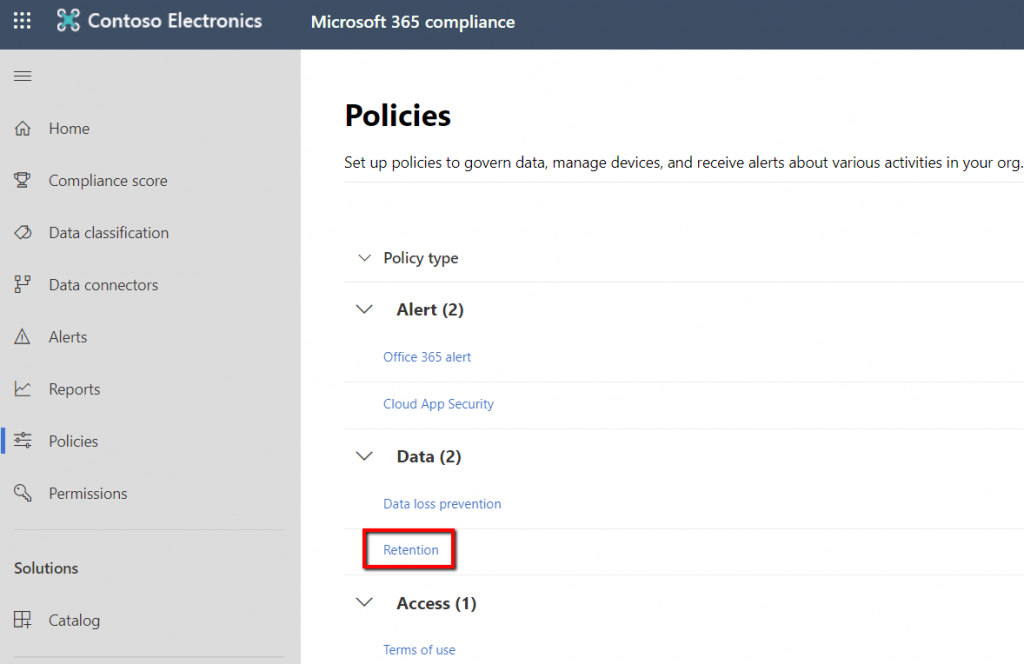
Retention policies link in the Compliance portal
Select the Retention tab and click “New Retention Policy”.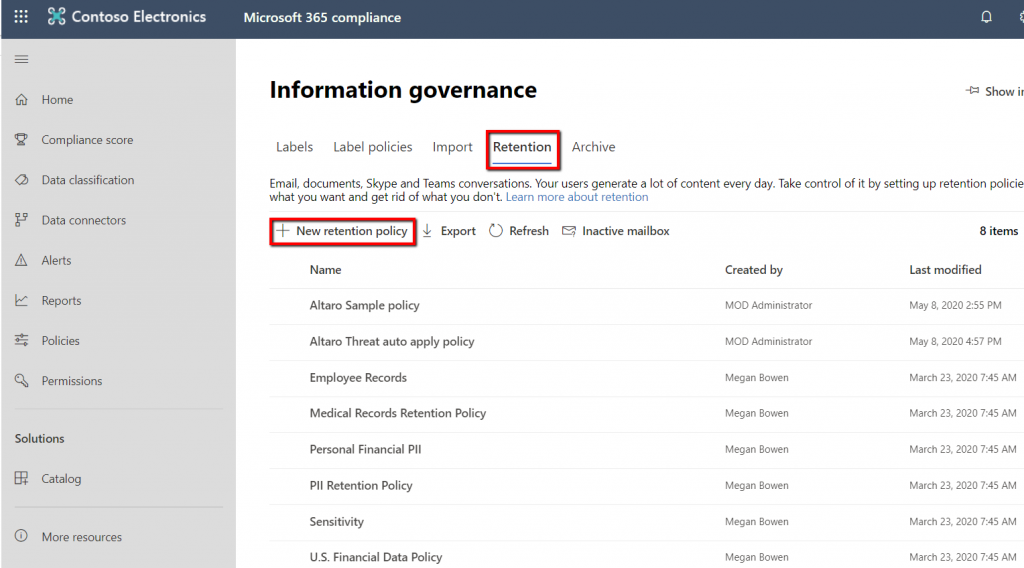
Retention policies and creating a new one
Give your policy a name and a description, select which data stores it’s going to apply to and whether the policy is going to retain and then delete data or just delete it after the specified time.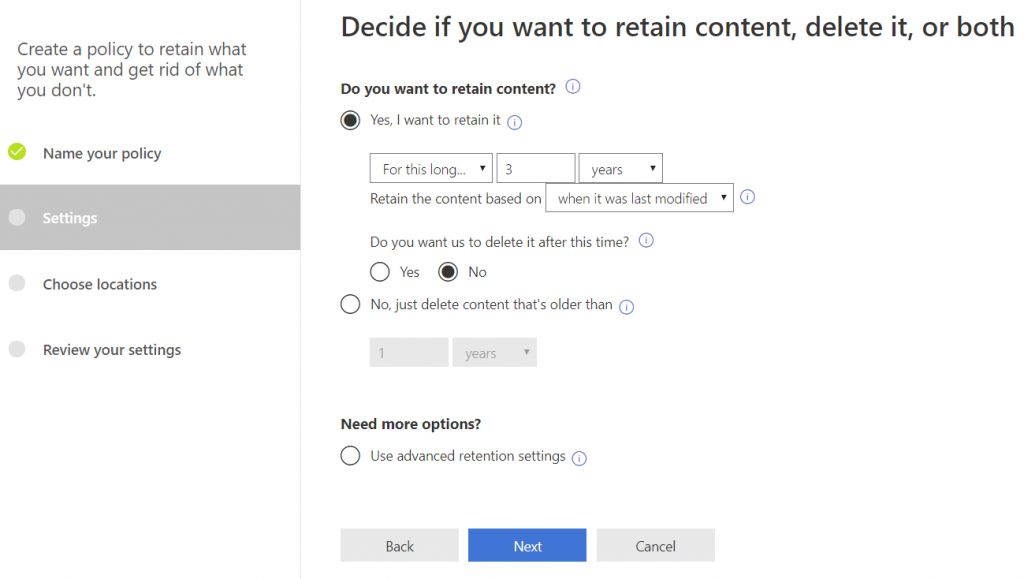
Retention settings in a policy
Sensitivity labels are outside of the scope of this article but are related. Instead of classifying data based on how long it should be kept, these policies classify data based on the security needs of the content. You can then apply policies to control the flow of emails with this content or automatically encrypt documents in SharePoint. You can also combine sensitivity and retention labels in policies.Conflicts
Since multiple policies can be applied to the same piece of data and perhaps even retention labels are in play, there could be a situation where conflicting settings apply. Here’s how these conflicts are resolved. Retention wins over deletion, ensuring nothing you expected to be retained is deleted, and the longest retention period wins. If one policy says two years and another says five years, it’ll be kept for five. The third rule is that explicit wins over implicit. So, if a policy has been applied to a specific area, such as a SharePoint library, it’ll take precedence over an organization-wide general policy. Finally, the shortest deletion policy wins so that if an administrator has chosen to delete content after a set period, it’ll be deleted then, even if another policy applies that requires deletion after a longer period of time. Here’s a graphic that shows the four rules and their interaction: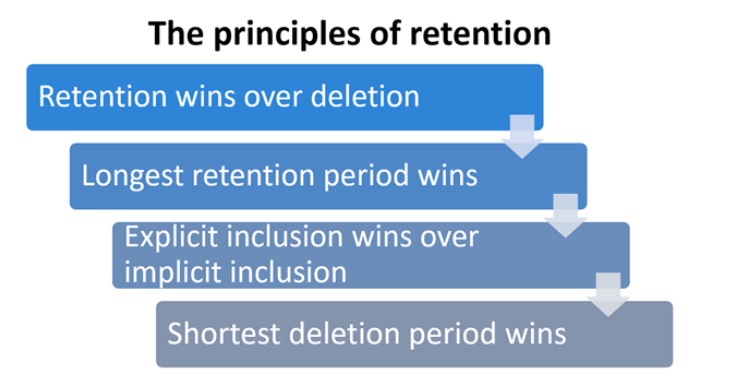
Policy conflict resolution rules (courtesy of Microsoft)
As you can see, building a set of retention policies that really work for your business and don’t unintentionally cause problems is a project for the whole business, working out exactly what’s needed across different workloads rather than the job of a “click-happy” IT administrator.Archive Mailbox
It all started with trying to rid the world of PST-stored emails. Back in the day, when hard drives and SAN storage only provided small amounts of storage, many people learned to “expand” the capacity of their small mailbox quota with local PST files. The problem is that these local files aren’t backed up and aren’t included in regulatory or eDiscovery searches. Office 365 largely solved part of this problem by providing generous quotas; the Business plans provide 50 GB per mailbox, whereas the Enterprise plans have 100 GB limits. If you need more mailbox storage, one option is to enable online archiving, which provides another 50 GB mailbox for the Business plans and an unlimited (see below) mailbox for the Enterprise plans. There are some limitations to this “extra” mailbox: it can only be accessed online, and it’s never synchronized to your offline (OST) file in Outlook. When you search for content, you must select “all mailboxes” to see matches in your archive mailbox. ActiveSync and the Outlook client on Android and iOS can’t see the archive mailbox, and users may need to manually decide what to store in which location (unless you’ve set up your policies correctly). For these reasons, many businesses avoid archiving mailboxes altogether, just ensuring all mailbox data is stored in the primary mailbox (after all, 100 GB is quite a lot of emails). Other businesses, particularly those with a lot of legacy PST storage, find these mailboxes fantastic and use either manual upload or even drive shipping to Microsoft 365 to convert all those PSTs to online archives where the content isn’t going to disappear because of a failed hard drive and where eDiscovery can find it. For those that really need it and are on E3 or E5 licensing, you can also enable auto-expanding archives, which will ensure that as you use up space in an online archive mailbox, additional mailboxes will be created behind the scenes to provide effectively unlimited archival storage. To enable archive mailboxes, go to the Security & Compliance Center, click “Information Governance,” and then click the “Archive tab.”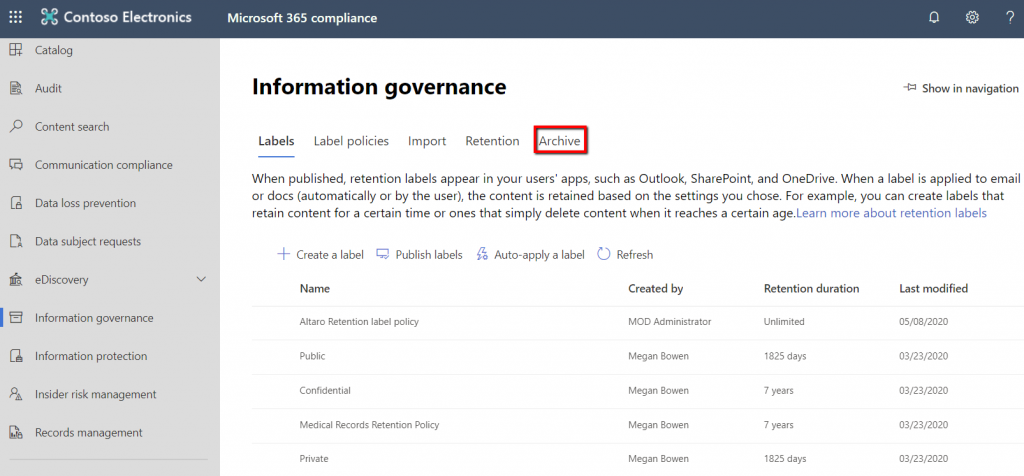
The Archive tab
Then click on a user’s name to be able to enable the archive mailbox.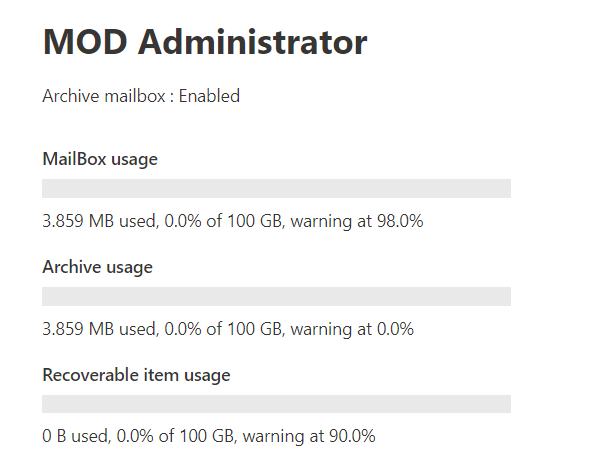
Archive mailbox settings
Once you have enabled archive mailboxes, you’ll need a policy to ensure that items are moved into the necessary cadence. Go to the “Exchange Admin Center” and click “Compliance Management – Retention Tags.”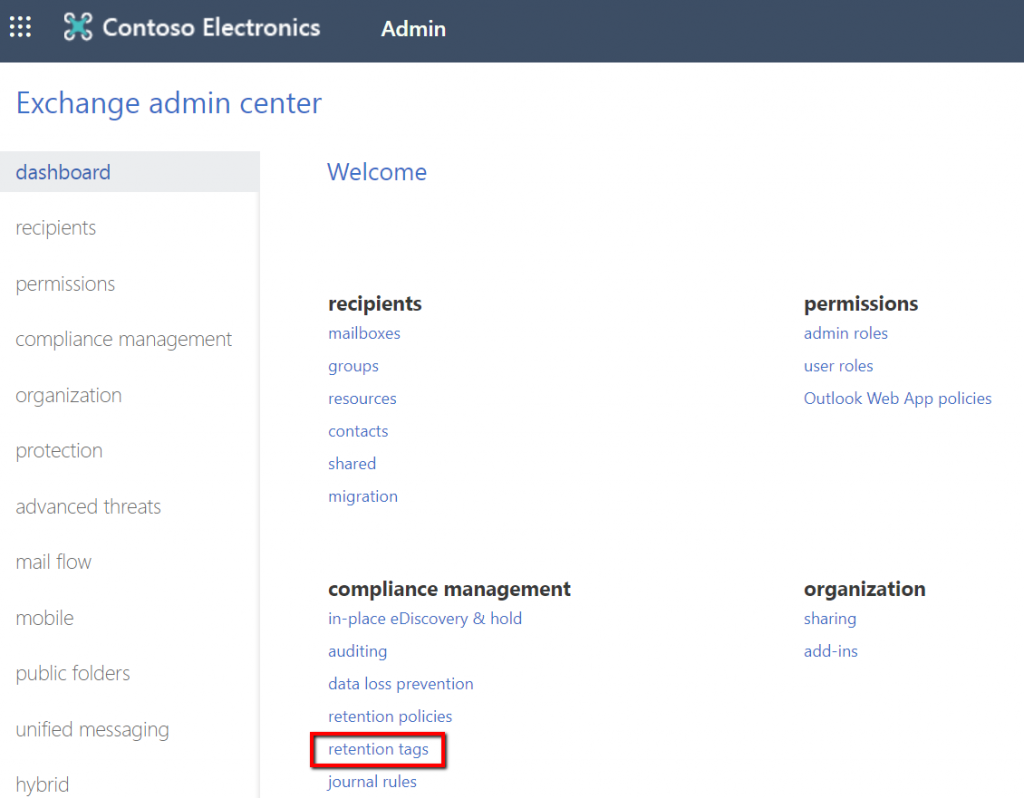
Exchange Admin Center – Retention tags
Here you’ll find the Default 2 year move to archive tag or you can create a new policy by clicking on the + sign.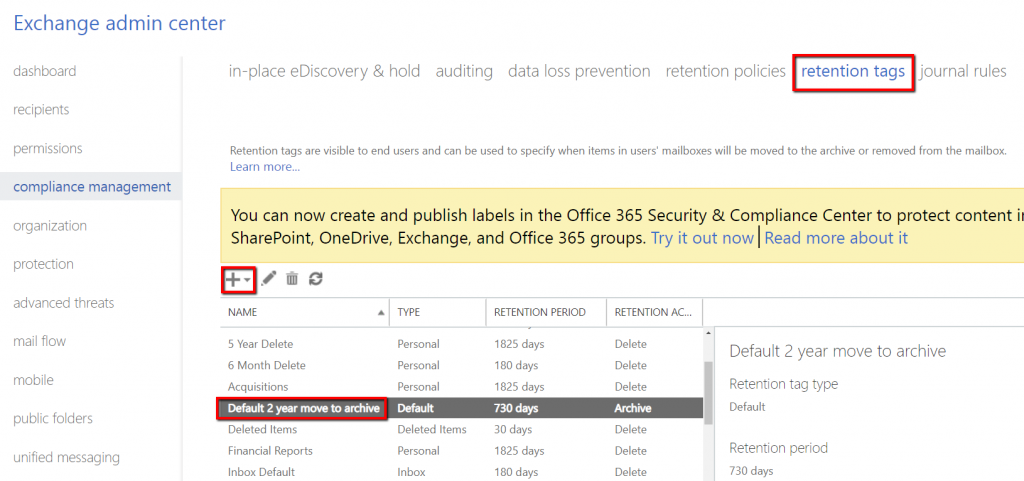
Exchange Retention tags default policies
Pick “Move to Archive” as the action, give the policy a name, and select the number of days that have to pass before the move happens.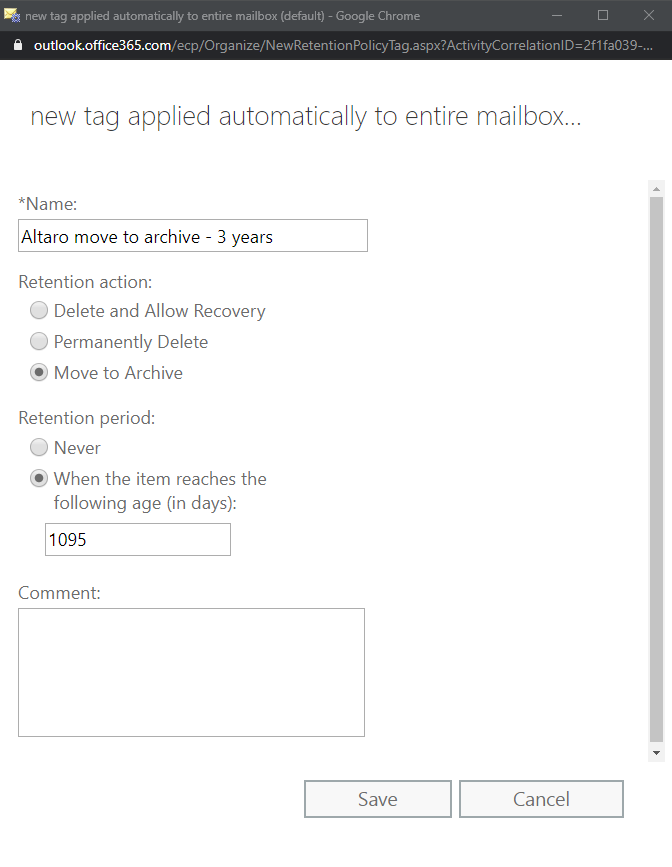
Creating a custom Move to archive policy
Note that online archive mailboxes have NOTHING to do with the Archive folder you see in the folder tree in Outlook. This is just an ordinary folder that you can move items into from your inbox for later processing. This Archive folder is available on mobile clients, and also, when you’re offline, you can swipe in Outlook mobile to automatically store emails in it.