

Protecting your data in M365 with Information Protection
A few years ago, the expression was “data is the new oil,” and that might be true, but when it comes to your organization’s documents stored in the cloud, I think a more apt description would be “data is radioactive.” Yes, you can do good things with it (generate electricity), but it’s dangerous stuff, and you shouldn’t keep it around for longer than you need to.
For most IT pros, data security is NTFS, share permissions, and SharePoint access levels. Turns out that doesn’t work so well anymore. Even when documents are stored in OneDrive for Business, SharePoint, and Exchange Online, they don’t stay there. They’re shared via Teams, third-party collaboration, and cloud storage services, via email, and even stored on USB sticks now and then. And when everyone is working from home or anywhere, you quickly lose what little control you used to have over where these documents are and who has access to them.
This is a serious problem for businesses, both big and small, and I think it is going to come much more into focus over the next few years. But there are actually technical solutions to this that you may already have paid to license for but are not using today, in the form of Microsoft Information Protection, sometimes called Azure Information Protection. This article will show you how it works, how to start using it, how to ensure the business is onboard, and what you can do at the different licensing levels.
The Basics
Before discussing protection, let’s talk about labeling, the foundation of M365 Information Protection. A document is labeled with a classification, such as “Sensitive” or “Highly Confidential,” and this label follows it wherever it goes. Then you apply policies that say that “Public” documents aren’t protected at all, but “Highly Confidential” ones have a watermark applied on each page (or a footer or a header) and are encrypted and that a user has to designate the specific internal or external users that should have access to it.
The labeling names are up to you; with some suggestions, you can have different labels scoped to different groups and have nested labels such as “Highly Confidential/All employees” and “Highly Confidential/Executives.” Again, the protection follows the document, and the recipient must prove who they are at the time of access and either give a few days grace period after the initial authorization to access the document offline or have to authenticate every single time.
Access can be time-limited, and specific permissions can be assigned, such as read-only, or you can’t print it, etc. For emails, you can apply “Do not forward,” “no printing,” etc. Many file types are supported out of the box, including the Office ones and PDF, with third-party add-ins on offer to protect CAD engineering files for instance.
Microsoft 365 E3 and Business Premium offer manual labeling of documents, relying on staff training (more below) and judgment, whereas Microsoft 365 E5 can automatically identify sensitive information and label documents for you.
Rather than relying on where a document is stored (file share, cloud storage, USB stick, etc.) and trying to control access there, M365 Information Protection embeds the protection in the document itself. This means that if you try to open a protected/encrypted document in a third-party application instead of Microsoft Office or a compatible PDF reader (Adobe Reader works), it won’t open.
Note that this isn’t an anti-hacker technology; it’s a way to ensure control over documents and help good people do the right thing. If I have read access to a document and I’m determined to steal the content, I can take photos of it with my smartphone, pop my laptop on the photocopier and hit print, or simply memorize the information. None of those actions can be claimed to be accidental if you’re caught, though. In contrast, if you have no information protection in place, you don’t even know if a copy of the text is pasted into another file or forwarded to a personal email address.
A building block of M365 Information Protection is Sensitive Information Types (SITs), which are built-in ways to spot different types of data. At the time of writing, there are 264 types, including classics such as credit cards and SWIFT codes, and adding bank account numbers, passport, and identification card numbers for many countries worldwide. There are also more recent additions such as IP addresses, disease IDs, names and physical addresses, Azure Storage Account keys, and many, many others. You can also create your own SITs for organization-specific terms.
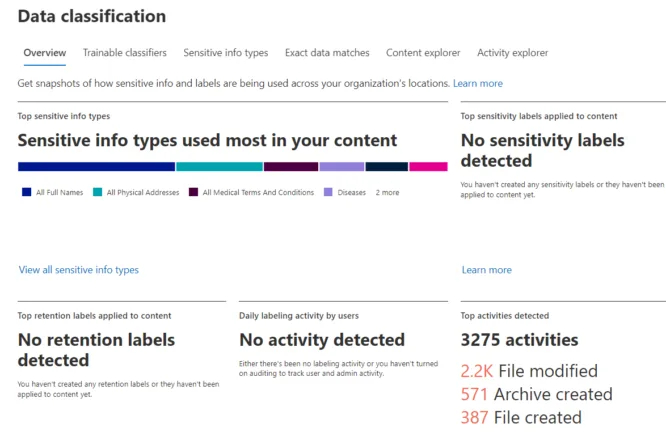
Data classification dashboardFor more complex document types, where a string of numbers and corroborating evidence words aren’t sufficient (16 numbers in groups of four, with the words CC, MasterCard, etc. next to it), you can use Trainable classifiers that rely on Machine Learning models to identify data. There are 19 built-in ones (for English, a total of 49 when Japanese, German, French, etc. are included) for Agreements, Finance, HR, Intellectual Property, Legal, Resume, Source Code, Profanity, Targeted Harassment, and Threats, plus several others.
If you have E5 licensing, you can also create your own by feeding it many documents of the type you’re seeking to classify (Australian Legal Contracts, for example) and then refine the model by feeding it the right kind of documents, as well as wrong ones, and manually marking each batch when it gets it right and wrong. When the model is accurate enough, you can publish it to your tenant and then use it in your policies.
If you have a database of terms or codes (say employee IDs or project numbers), you can use Exact Data Match (EDM) to spot these when they show up in documents or emails.
To see the SITs and other sensitive information types, go to compliance.microsoft.com, log in with an administrator account, and go to Data Classification in the menu on the left.
But how do you know what sensitive data you’ve already got in your tenant so you know where to start? That’s where Content Explorer comes in; as long as you’ve been assigned the extra roles (on top of Global Admin) of Content Explorer List Viewer and Content Explorer Content Viewer, you can browse and see what’s already stored in your tenant. Here’s my tenant:
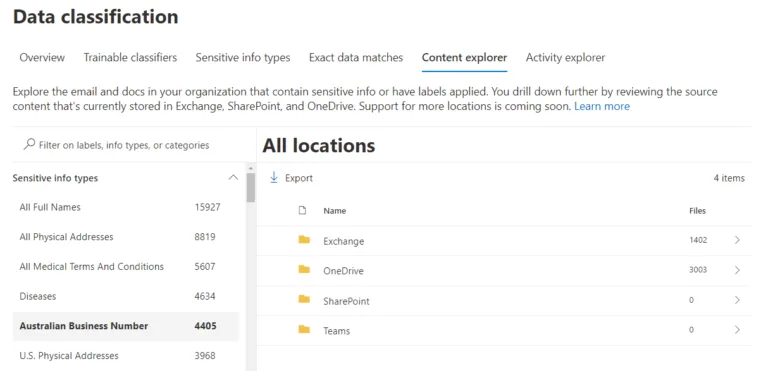
Content Explorer in M365 Information ProtectionAs you can see, many names across email and OneDrive for Business make sense, as does Australian Business Number, while the disease identification is a false positive. I can then drill down to individual documents, and if I have the Content Viewer role, I can even preview the documents themselves (obviously, be careful with this permission). This should give you a good starting point for understanding what sensitive data you have stored.
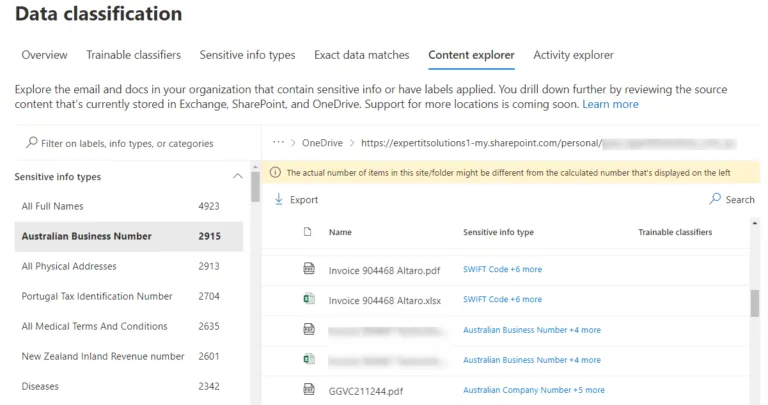
Documents identified in Content ExplorerOn the other hand, Activity Explorer shows you what users are doing with documents when you start using labels and protections and how they’re being used.
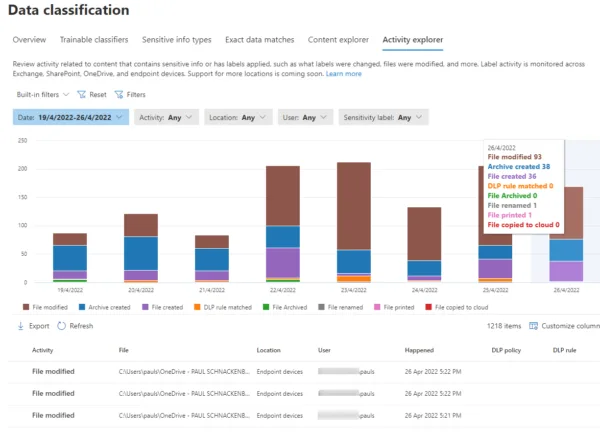
Activity Explorer in M365 Information ProtectionNowadays, it’s not just files and emails that can be labeled; you can also apply your classifications to SharePoint sites and M365 groups (this is in preview at the time of writing and requires manual steps to enable). Note that today, that doesn’t mean that the documents inside those containers are automatically labeled (they don’t work as NTFS permissions, in other words); it means that you can control the external sharing of documents from those locations.
Finally, you can also apply M365 Information Protection labels and policies to data other than documents using Microsoft Purview (up until very recently called Azure Purview). This extends the whole concept of labels to databases (SQL, Cosmos DB, Amazon RDS, Cassandra, DB2, Google BigQuery, and others), cloud storage, data lakes, etc.
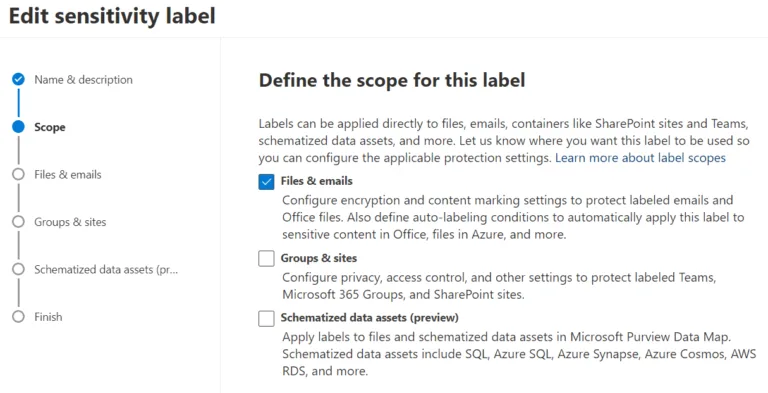
Scoping a sensitivity label in M365 Information Protection
Applying the labels
OK, you have worked out what labels to use (see below), at least for your first pilot project. Now, you need to create your policies to actually apply them. Still, in the compliance portal, go down to Solutions – Information Protection. Here, you create your labels based on the SITs and other classification options covered above and then publish them using Label policies.
Pick the label(s) to publish and scope it to users and groups (you can select All for a companywide policy) and then select Policy Settings.
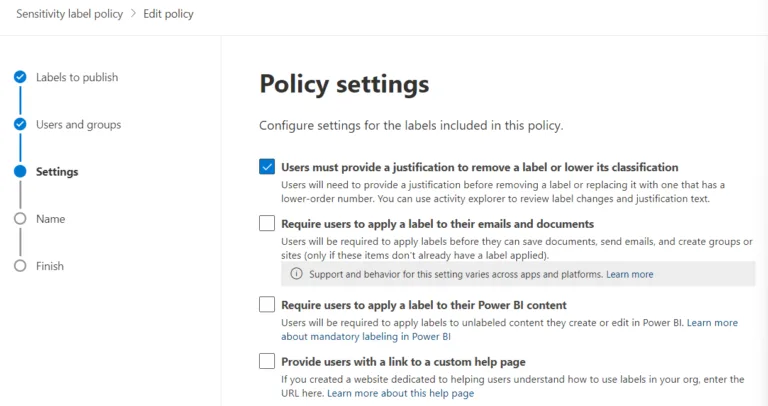
Policy settings for a Sensitivity label policyHere you can make it so that users must provide a business justification when removing a label or lower it to a less sensitive one, requiring users to always apply a label (be very careful with this setting; see below), requiring labeling for PowerBI content and offer a link to a custom, inhouse help page. Make sure that you give your policy a descriptive name that fits neatly into the flyout under the button in the Office apps and a longer description as well. This might seem trivial, but it is actually crucial in helping users understand what label to use for each type of content.
Realistically, though, asking users to manually label documents and emails (hopefully without enforcing it) is only going to take you so far, and only with new documents. To really get a handle on and label all your data, you must use Auto-labeling policies. These are available in E5 licensing (for a good breakdown of what’s available in each licensing tier – see here).
These will scan through existing documents in OneDrive for Business and SharePoint online and label documents based on sensitive data found, optionally applying markings and encryption based on your label settings. When you first create one, you can run it in simulation mode to ensure that it’s going to work as you expected.
If you have documents on-premises, in file shares / SharePoint server, you can use the Azure Information Protection scanner to do the same for all that data. Managed from the cloud, once the agents are deployed on-premises, they will scan SMB or NFS (preview) shares and SharePoint 2013 to 2019 servers.
Another important step to take is to designate a group of highly trusted users as super users so that they can unencrypt documents that were protected by an end-user who’s no longer with the company, for instance.
I haven’t gone into it, but M365 Information Protection has had manynames over the years, so if you see references to Azure Information Protection, Azure Rights Management Services, etc., they’re all talking about the same thing. The current product is also unified within Microsoft 365, and the client agent is built into Apps for Business / Apps for Enterprise, which the rest of the world calls Office – i.e., Word, Excel, and so forth on your desktop, on a smartphone or the web version in a browser.
Working with the business
This is the most important part of this article – the technology isn’t the crucial bit, even though it’s cool – it’s engaging with the rest of the business. Successfully implementing M365 Information Protection in your business relies on you being able to get executive sponsorship – it’s got to be something that the business leaders understand and see as aligned with business outcomes. If it’s something IT is trying to “enforce” for compliance reasons on their own, it’s unlikely to succeed.
After the executives are onboard and lead by example (as they often handle the most sensitive data in the business), you need to train your users. Start small, perhaps with a group of users in the legal, finance, or HR department who understand the need more than other staff. Gather feedback and really understand how adding extra steps to their daily workflow impacts productivity. Ensure that the labels are crystal clear and that there are as few as possible.
When you first start out, especially in a large business, you can end up with dozens of labels, with each department insisting that their Highly Confidential classification is different than in another department. Be ruthless – to have any chance of success. You must get everyone to agree on a small set of labels that are clear to everyone. If required, you can have different labels for different groups of users; just be aware of the potential management and maintenance overhead.
Just like file permissions can be straightforward on a new file server, over time, minor changes and exceptions can make maintenance hard, so plan for quarterly meetings to go back over labels and usage and impacts in the business to ensure that you can adjust as M365 Information Protection is more and more adopted by the organization (Activity Explorer really helps with this).
Also – make it fun! Have competitions to see who can label as many documents as possible or who used the most labels in a week.
To properly protect your Microsoft 365, use Office 365 backup by Altaro to securely backup and replicate your crucial Microsoft Office 365 data. We work hard perpetually to give our customers confidence in their Office 365 backup for MSPs strategy.
Conclusion
M365 Information Protection ties in nicely with several other governance features such as Data Loss Prevention (DLP), which is now available on Windows and MacOS endpoints as well as in the cloud. It’s also related to Retention policies and Records management and is part of an overall strategy to secure your Microsoft 365 tenant.
As you can appreciate, Information Protection is a huge area of Microsoft 365 and one that is constantly evolving; a good place to catch the latest as well as ask questions is the Information Protection public Yammer community.

